

Importing & Exporting Integrations (CSV)
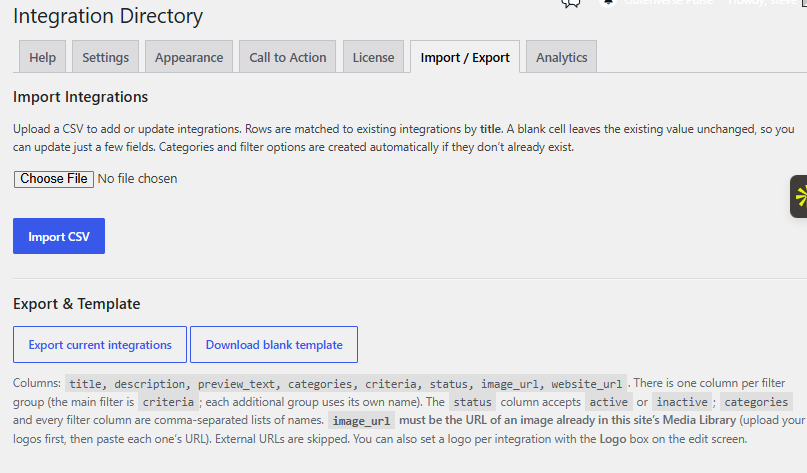
The CSV tools let you add or update integrations in bulk, and pull your whole directory out to a spreadsheet for editing or backup. You’ll find everything under Integrations → Settings on the Import / Export tab.
This is the fastest way to launch a directory, migrate from another site, or make the same change across dozens of integrations at once. If you only have one or two integrations to touch, the normal editor is usually quicker.
Where to find it
Go to Integrations → Settings and open the Import / Export tab. You’ll see three actions:
- Import CSV – upload a file to create or update integrations.
- Export current integrations – download every integration as a CSV.
- Download blank template – get an empty CSV with the correct columns and one example row.
The columns in all three line up exactly, so the cleanest workflow is: export (or download the template), edit in your spreadsheet app, then import the same file back.
How importing works
Each row in your CSV is one integration. On import, the plugin:
- Matches rows by title. If an integration with that exact title already exists, the row updates it. If not, a new integration is created.
- Leaves blank cells alone. An empty cell never wipes existing data — it simply leaves that field (or filter group) unchanged. This is what lets you update just a couple of columns without re-entering everything else.
- Auto-creates options. Any category or filter option that doesn’t exist yet is created for you on the fly.
When the import finishes, you’ll see a report at the top of the tab summarizing how many integrations were created, updated, and skipped, along with any per-row errors (for example, a logo URL that couldn’t be matched). Read it — it’s how you confirm the import did what you expected.
Heads up: matching is by the exact title, so “Acme CRM” and “Acme CRM” (with a double space) are treated as two different integrations. If a re-import unexpectedly creates duplicates, a title mismatch is almost always the cause. Trashed integrations are never matched, so an import won’t silently revive something you deleted.
The columns
Every CSV has a fixed set of base columns, followed by one column per filter group (more on that below). The base columns are:
| Column | Required | What it does |
|---|---|---|
title |
Yes | The integration name. This is the match key — rows are paired to existing integrations by this exact value. A row with a blank title is skipped. |
description |
No | The main body content shown on the detail page. HTML is allowed. |
preview_text |
No | The short blurb shown in the directory listing (the Preview Text field). Setting it enables the “Learn more” link; left blank, the listing is still clickable. |
categories |
No | A comma-separated list of category names. New categories are created automatically. |
criteria |
No | The options for your main filter group, as a comma-separated list of names. (See the next section.) |
status |
No | active publishes the integration; inactive sets it to Draft. Blank leaves the current status as-is. |
image_url |
No | The logo (featured image). Must be a URL of an image already in this site’s Media Library. See the logo notes below. |
website_url |
No | The integration’s Website URL, which powers the “Visit Website” button. |
The status column maps directly to WordPress: active means Published and inactive means Draft. When you update an existing integration, demoting only affects a currently-published one, and leaving status blank never changes the current state.
One column per filter group
This is the main change in this version. The directory now supports any number of filter groups (facets like Pricing, Platform, or Setup), and the CSV gives each group its own column:
- The main filter always uses the
criteriacolumn. This is unchanged from older CSVs — a file you exported before adding more groups still imports exactly as it always did. - Every additional filter group gets its own column, named after the group (for example, a group called Pricing exports as a
Pricingcolumn). On import, the column is matched by the group’s name or key, so a hand-made or renamed CSV still maps to the right group. - Each filter column is a comma-separated list of option names, exactly like
categories. Options that don’t exist yet are created automatically. - A blank cell leaves that group’s assignments untouched, the same as any other field. So you can re-import a file that only fills in one group’s column without disturbing the others.
Because the exact set of filter columns depends on how many groups you’ve set up, the safest approach is to export your integrations first (or download the blank template) and edit that file — the headers will already match your groups. To add, rename, or remove groups and their options, see Managing Your Filters.
Heads up: the main filter’s column is always literally criteria, even if you’ve renamed the group in the admin. Only the additional groups use their display name as the column header. If you rename a group, re-export to get a template with the current header.
What’s not in the CSV
A few of the richer profile fields are not CSV columns in this build — you set them in the editor on each integration:
- Badges (the small labels, such as Premier or Certified, that appear as pills on the listing)
- Video URL (embedded on the detail page)
- Screenshots (the gallery on the detail page)
- Resource links (labeled links such as Documentation or a case study)
The Featured flag (in the Logo box) is also editor-only. Everything else — title, description, preview text, categories, your filter groups, status, logo, and website — comes through the CSV.
Logos and the image_url column
The importer links a logo from your Media Library; it does not download anything. That keeps imports fast and avoids the memory crashes that bulk remote-image downloads cause on shared hosting.
So before you import logos:
- Upload your logo images to this site’s Media Library first.
- Copy each image’s full-size URL.
- Paste that URL into the
image_urlcell for the matching row.
Heads up: the URL must point at an image on this site. An external URL is not used — it’s reported as an error in the import results — and a URL that isn’t found in this site’s Media Library is reported as an error too. Either way, the rest of that row still imports normally. If a logo doesn’t stick, check that you used the exact full-size Media Library URL from this site. You can also just leave image_url blank and set the logo later from the Logo box in the editor.
Exporting
Click Export current integrations to download every integration — published and draft alike — as a CSV. The columns match the import format exactly, so an exported file is a ready-to-edit, re-importable template that already includes a column for each of your filter groups.
Export is also a quick, dependable way to back up your directory content before a big change.
Tips for a clean import
- Start from an export or the template. Don’t build the header row by hand — let the plugin generate it so your filter-group columns line up.
- Keep titles exact and consistent. The title is your match key, so watch for trailing spaces, stray capitalization, and smart-quote differences.
- Use blank cells deliberately. A blank cell preserves existing data. To update only a few fields, fill just those columns and leave the rest empty.
- Upload logos first. Get your images into the Media Library and grab their URLs before you import.
- Do a small test run. Import a handful of rows, check the report and a couple of integrations on the front end, then run the full file.
- Mind your separators. Categories and every filter column are comma-separated lists, so don’t use commas inside a single option name.
Related articles
- Managing Your Filters — add, rename, and organize the filter groups and options that become your CSV columns.
- Building an Integration — the editor fields, including the ones (Badges, Video URL, Screenshots, Resource links, Featured) that aren’t in the CSV.