

Richer Integration Profiles (Video, Screenshots & Resource Links)
Every integration in your directory has its own detail page at /integrations/{slug}. Beyond the title, logo, and body content, this build gives each integration three richer fields you can fill in from the editor: a Video URL, a Screenshots gallery, and a set of Resource links. They turn a plain listing into a proper profile that helps visitors size up the integration before they ever click through.
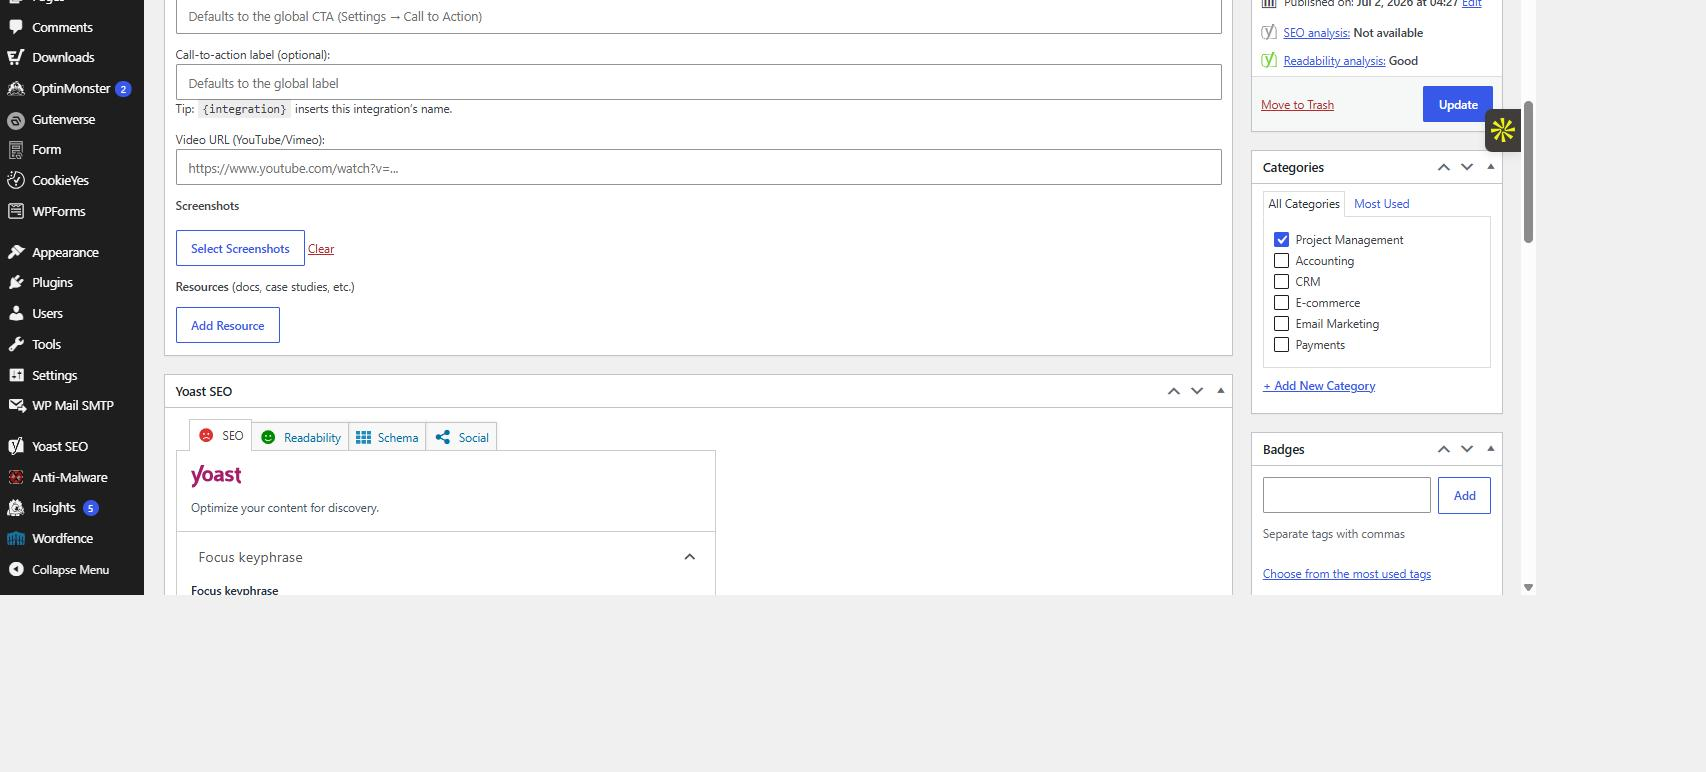
All three are optional. Add what you have, skip what you don’t, and the detail page adjusts — an empty field simply renders nothing.
Where these fields live
Open any integration for editing (Integrations → Add New, or click an existing one). The three rich fields sit in the same editor box as Preview Text and Website URL, just below them. You set everything here in the editor and save the integration as usual.
Heads up: these three fields are editor-only in this build. They are not CSV columns, so the Import / Export tab won’t bring them in or push them out — you add Video, Screenshots, and Resource links by hand on each integration. (Badges are the same way; see the Building an Integration article for the full field tour.)
Where they show up on the detail page
On the public detail page, the plugin builds the layout top to bottom in a fixed order:
- The automatic Back to Integrations link (which points at the Directory Page URL you set under Integrations → Settings).
- The Visit Website button — shown only if the integration has a Website URL.
- Your body content.
- The rich media, in turn: the video embed, then the screenshots gallery, then the resource links.
So the video, screenshots, and resources render as their own sections directly after your body content, below the back link and the Visit Website button. You don’t place them manually on the page — fill in the fields and the plugin renders each section in order.
Video URL
The Video URL field (labeled Video URL (YouTube/Vimeo) in the editor) takes a single video link. Paste the link, save, and the plugin embeds the player automatically on the detail page using WordPress oEmbed — the same mechanism core WordPress uses when you drop a video link into a post. YouTube, Vimeo, and the other oEmbed-supported providers all work; you don’t paste embed code or an <iframe>, just the plain URL.
Tips for the Video URL
- Use the public watch or share URL, e.g.
https://www.youtube.com/watch?v=...or the link from the platform’s “Share” button. That’s the form oEmbed recognizes. - One video per integration. This is a single-link field — if you have several clips, link the rest under Resource links or build a short playlist and paste that.
- Make sure the video is public (or unlisted). Private or region-blocked videos won’t embed.
- If a pasted link doesn’t turn into a player, the provider probably isn’t oEmbed-supported — double-check you used the watch/share URL rather than a channel or search page.
Screenshots
The Screenshots field is a gallery you build by multi-selecting images from the WordPress Media Library. In the editor, click Select Screenshots to open the media picker, choose one or more images, and confirm — your selections appear as small thumbnails in the editor. Use the Clear button to start the selection over.
Heads up: the picker chooses from images that are already in the Media Library. Upload your screenshots first (drag them into the Media Library, or use the Upload Files tab inside the picker), then select them — the gallery references existing attachments rather than uploading on its own.
On the detail page the screenshots render as a gallery of thumbnails, and each one links to the larger image so visitors can open it full size.
Tips for Screenshots
- Keep sizing consistent. Screenshots of similar dimensions and aspect ratio line up far more cleanly than a mix of tall and wide images.
- Order matters — pick your images in the order you want them shown, leading with the most representative shot.
- Crop tightly to the part of the UI you’re showing, and keep file sizes reasonable so the page stays fast.
- A handful of strong screenshots beats a long, repetitive reel.
Resource links
The Resource links field (the Resources section in the editor) is a set of labeled links — think Documentation, Pricing, or Case study. Click Add Resource to add a row, then fill in a Label and a URL. Add as many rows as you need; use the Remove link on a row to delete it.
On the detail page these render as a simple list under a Resources heading, each item being the label you gave it linked to its URL.
Tips for Resource links
- Give every link a clear label. “Documentation” or “Pricing” tells a visitor exactly where they’re headed — far better than a bare URL.
- Both a label and a URL help, but a row needs at least a URL to appear; if you leave the label blank the link text falls back to the URL itself, so it’s worth filling both in.
- Keep the set focused — a few high-value links (docs, pricing, a proof point) are more useful than a long pile.
Field reference
| Field | Editor label | What you enter | How it shows on the detail page |
|---|---|---|---|
| Video URL | Video URL (YouTube/Vimeo) |
One public video link (watch/share URL) | An embedded player (via WordPress oEmbed) |
| Screenshots | Screenshots → Select Screenshots | One or more images chosen from the Media Library | A gallery of thumbnails; each opens the larger image |
| Resource links | Resources → Add Resource | A label plus a URL, per row | A list of labeled links under a Resources heading |
Related
For the complete walkthrough of creating an integration — title, logo, Preview Text, Website URL, categories, filter groups, and badges — see Building an Integration.